|
|
|
| Engisoft 2003 Projector Lights Instructions |
Refer to Figure A
Remove lower headlight trim (12).
Remove the 3 screws (2, 3, 7) holding the headlight assembly. 1 on top and 2 on the bottom.
Unplug headlight.
NOTE:
Take care not to scratch the vehicle's paint.
Handle assemblies with care.
Assemblies are very fragile when they are not mounted.
|
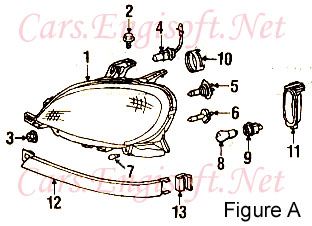 |
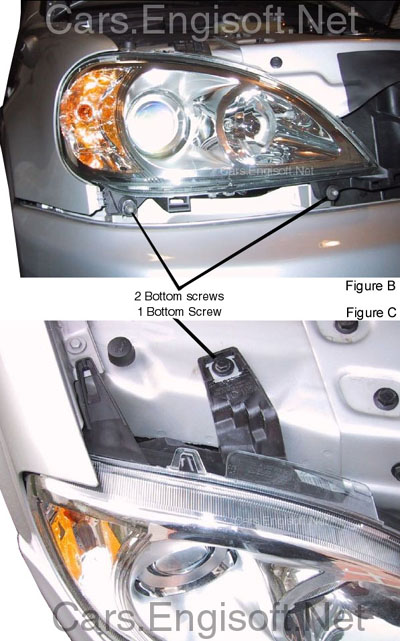
Refer to Figure A, B, C
Plug the new projector light into the vehicle's electrical harness.
Fit assembly into place so that screw holes line up.
Install the left bottom bolt (3) loosely
Install the top screw (2) loosely
Install the right bottom bolt (7) loosely
You may now tighten all bolts to about 14 in/lbs torque.
NOTE:
Do not over tighten. This may cause the headlight assembly to crack.
|
 |
Repeat the above steps for the opposite headlight.
After installing the headlight, you may move on to the alignment procedures.
NOTE:
If you are installing xenon headlights, you will need to replace your headlight fuses with 30A fuses.
|
| Headlamp Alignment Procedure |
 |
 |
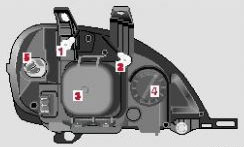
| 1. | Headlamp vertical/horizontal adjustment screw. |
| 2. | Headlamp vertical/horizontal adjustment screw. |
| 3. | Headlamp cover with locking tab. |
| 4. | High beam headlamp cover with locking tab. |
| 5. | Bulb socket for turn signal, parking, standing, and
side marker lamp. |
|
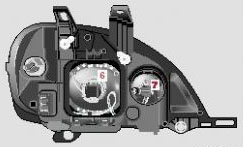
| 6. | Electrical connector for low beam headlamp bulb. |
| 7. | Electrical connector for high beam headlamp bulb. |
|
|
 |
Correct headlamp adjustment is extremely important. To check and readjust a headlamp, follow steps 1 through steps 1 through 7.
NOTE:
High beam adjustments simultaneously aim the low beam.
Vehicle should have normal trunk load. |
| 1. Park vehicle on level surface approximately 6 Inches (152 mm) from a vertical test screen or wall. The ceterline of the vehicle must be at a 90 degree angle to the test screen. |
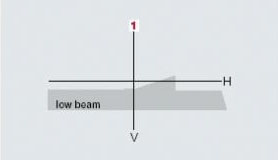
2. (High beams on):
Using a carpenter's level, align and mark a vertical centerline (1) on the test screen for each headlamp
lens at a distance of 25 3/4 inches (654 mm) from the vertical centerline. As a check, the distance between
centerlines should be 51 1/2 inches (1308 mm). The star emblem on the hood may be used to determine the vehicle centerline.
If the distance does not check, have the system verified an authorized Mercedes-Benz Light Truck Center. |
| 3. Move vehicle on the level surface 25 feet (7.6 m) straight back from the wall. |
| 4. Open hood |
5. (High beams on):
Simultaneously turn adjusting screws counterclickwise to adjust
headlamp downward, clockwise upward equally until bubble in the
level is centered on the "0" mark.
Graduations
screw 1: 0.050 Degrees Pitch
screw 2: 0.067 Degrees Pitch
|
6. Horizontal headlamp aim (High beams on):
Turn adjusting screw (2) left headlamp: counter
clockwise to adjust to the left, clockwise to
the right [right headlamp in opposite direction]
until the headlamp (high beam pattern) is centered
about the vertical centerline (1) as shown.
The left and right headlamps must be adjusted
individually |
7. For proper aim, the indicator should
align with the "0" mark after horizontal adjustment.
Graduations: 0.33 Degrees Pitch.
NOTE:
If it is not possible to obtain a proper
headlamp adjustment, have the system checked
at your authorized Mercedes-Benz Light Truck Center.
|
|
|